ALT_IMG

Money Loves You!

Love is crazy. It is invisible but being so strong. It makes people who become gentlemen or evil ever. Love is a beautiful gift of mankind. When we fall in love someone, our feeling and mind always tend to that object. Readmore...

Monday, January 2, 2012

Related Posts Widget for Blogger with Thumbnails

0 comments

Related Posts with Thumbnails for Blogger

related posts with thumbnails for blogger
Displaying the links to related posts along with a thumbnail of the corresponding post will help you increase the page views/user .Users will be tempted to go for the related posts when they are presented attractively with thumbnails.
This is another first release from me.This one also uses the media thumbnails generated by blogger for each post.
For displaying the thumbnails,this widget will use the images uploaded for the post using the blogger image uploader(from the post editor) [Update - Now supports external images also.]

Related Posts Widget with Thumbnails for Blogger

Here are the detailed steps to install the related posts widget for blogger with thumbnails
1.First of all Login to your blogger dashboard and navigate to Layout > Edit HTML and check the "Expand Widget Templates" check box
2.Now look for
</head>
and replace it with
<!--Related Posts with thumbnails Scripts and Styles Start-->
<!-- remove --><b:if cond='data:blog.pageType == &quot;item&quot;'>
<style type="text/css">
#related-posts {
float:center;
text-transform:none;
height:100%;
min-height:100%;
padding-top:5px;
padding-left:5px;
}

#related-posts h2{
font-size: 1.6em;
font-weight: bold;
color: black;
font-family: Georgia, &#8220;Times New Roman&#8221;, Times, serif;
margin-bottom: 0.75em;
margin-top: 0em;
padding-top: 0em;
}
#related-posts a{
color:black;
}
#related-posts a:hover{
color:black;
}

#related-posts  a:hover {
background-color:#d4eaf2;
}
</style>
<script type='text/javascript'>
var defaultnoimage="https://blogger.googleusercontent.com/img/b/R29vZ2xl/AVvXsEikv2T5Lp751ypL0pOvMTnTP5chJFirMIl0FHqbqpJbjCeHjyW1BqdPv8GN2IW2EwM2VW1IXejT2TeRtH4Obow4LR3nOFLt1ZnuA0JjQRdRHxyZfVCs7z5jtZRdd4n_pcES8Nk9dG1yrmc/s400/noimage.png";
var maxresults=5;
var splittercolor="#d4eaf2";
var relatedpoststitle="Related Posts";
</script>
<script src='http://blogergadgets.googlecode.com/files/related-posts-with-thumbnails-for-blogger-pro.js' type='text/javascript'/>
<!-- remove --></b:if>
<!--Related Posts with thumbnails Scripts and Styles End-->
</head>
3.Now Find
<div class='post-footer-line post-footer-line-1'>
If you cant find it then try finding this one
<p class='post-footer-line post-footer-line-1'>
Now immediately after any of these lines(whichever you could find) place this code snippet
<!-- Related Posts with Thumbnails Code Start-->
<!-- remove --><b:if cond='data:blog.pageType == &quot;item&quot;'>
<div id='related-posts'>
<b:loop values='data:post.labels' var='label'>
<b:if cond='data:label.isLast != &quot;true&quot;'>
</b:if>
<script expr:src='&quot;/feeds/posts/default/-/&quot; + data:label.name + &quot;?alt=json-in-script&amp;callback=related_results_labels_thumbs&amp;max-results=6&quot;' type='text/javascript'/></b:loop>
<script type='text/javascript'>
removeRelatedDuplicates_thumbs();
printRelatedLabels_thumbs(&quot;<data:post.url/>&quot;);
</script>
</div><div style='clear:both'/>
<!-- remove --></b:if> 
<b:if cond='data:blog.url == data:blog.homepageUrl'><b:if cond='data:post.isFirstPost'>
<a href='http://www.bloggerplugins.org/2009/08/related-posts-thumbnails-blogger-widget.html'><img style="border: 0" alt="Related Posts Widget For Blogger with Thumbnails" src="http://image.bloggerplugins.org/blogger-widgets.png" /></a><a href='http://bloggertemplates.bloggerplugins.org/' ><img style="border: 0" alt="Blogger Templates" src="http://image.bloggerplugins.org/blogger-templates.png" /></a>
</b:if></b:if>
<!-- Related Posts with Thumbnails Code End-->
4.You can adjust the maximum number of related posts being displayed by editing this line in the code.
var maxresults=5;
you will also have to edit the posts per label(it should ideally be one more that maxresults)
max-results=6
5.To edit the title of the widget you can change this line of code
var relatedpoststitle="Related Posts";
6.To change the default thumbnail, you can edit this line of code
var defaultnoimage="https://blogger.googleusercontent.com/img/b/R29vZ2xl/AVvXsEikv2T5Lp751ypL0pOvMTnTP5chJFirMIl0FHqbqpJbjCeHjyW1BqdPv8GN2IW2EwM2VW1IXejT2TeRtH4Obow4LR3nOFLt1ZnuA0JjQRdRHxyZfVCs7z5jtZRdd4n_pcES8Nk9dG1yrmc/s400/noimage.png";
7.To Change the Colour of the Splitter Line , edit
var splittercolor="#d4eaf2";
To change the other colours and all you will have to modify the CSS
If you fall into troubles implementing this,don't panic.. :) .just leave me a comment here and i will help you out. If you like to give me any suggestions on how to improve this widget,then it would be really great.

How to display the related posts on every page and not only on the post pages?

Just remove the two lines starting with <!-- remove --> from both step 3 and step 2.
that is lines
<!-- remove --><b:if cond='data:blog.pageType == &quot;item&quot;'>
and
<!-- remove --></b:if>
Continue reading →

Sử dụng TrueCrypt để mã hóa những tài liệu nhạy cảm

0 comments
Dữ liệu trên máy tính là nguồn tài sản vô cùng quý giá đối với mọi người dùng. Tuy nhiên, trừ khi chúng được mã hóa, nếu không người ngoài hoàn toàn có thể truy cập vào đó trái phép mà không cần biết mật khẩu Windows của bạn. Đơn giản là khởi động vào hệ điều hành từ đĩa hoặc thiết bị USB.
Nếu phải thường xuyên làm việc với dữ liệu nhạy cảm, như tài liệu trong công ty hay văn bản tài chính… tốt nhất nên mã hóa chúng để bảo vệ trước những kẻ “nhìn lén”, đặc biệt là khi lưu trữ trên những thiết bị di động dễ làm mất như laptop, điện thoại…
Đáp ứng nhu cầu này của người dùng các hãng bên thứ ba đã cho ra mắt các ứng dụng có chức năng mã hóa tài liệu mạnh mẽ. Trong bài viết này chúng tôi sẽ hướng dẫn các bạn sử dụng tiện ích TrueCrypt phát hành bởi TrueCrypt Foundation. Với những ưu điểm là phần mềm hoàn toàn miễn phí, mã nguồn mở, bạn có thể tạo ổ đĩa ảo được mã hóa hoặc mã hóa toàn bộ đĩa cứng của mình (bao gồm cả ổ cài đặt Windows).
Cơ chế thiết lập và quản lý của TrueCrypt là mã hóa ổ đĩa trên đường đi (on-the-fly encryption). Nghĩa là dữ liệu tự động được mã hóa hoặc giải mã ngay khi được ghi xuống đĩa cứng hoặc ngay khi dữ liệu được nạp lên mà không có bất kỳ sự can thiệp nào của người dùng. Dữ liệu được lưu trữ trên một ổ đĩa đã được mã hóa (encryption volume) không thể đọc được nếu người dùng không cung cấp đúng khóa mã hóa bằng một trong ba hình thức là mật khẩu (password) hoặc tập tin có chứa khóa (keyfile) hoặc khóa mã hóa (encryption key). Toàn bộ dữ liệu trên ổ đĩa mã hóa đều được mã hóa (ví dụ như tên file, tên folder, nội dung của từng file, dung lượng còn trống, siêu dữ liệu…). Dữ liệu có thể được copy từ một ổ đĩa mã hóa củaTrueCrypt sang một ổ đĩa bình thường không mã hóa trên Windows (và ngược lại) một cách bình thường mà không có sự khác biệt nào cả, kể cả các thao tác kéo-thả.
Trong phần minh họa sau đây chúng tôi chủ yếu tập trung vào quá trình tạo ổ đĩa ảo được mã hóa, cho phép bạn bảo vệ các tài liệu nhạy cảm cụ thể mà không cần mã hóa toàn bộ ổ đĩa cứng.
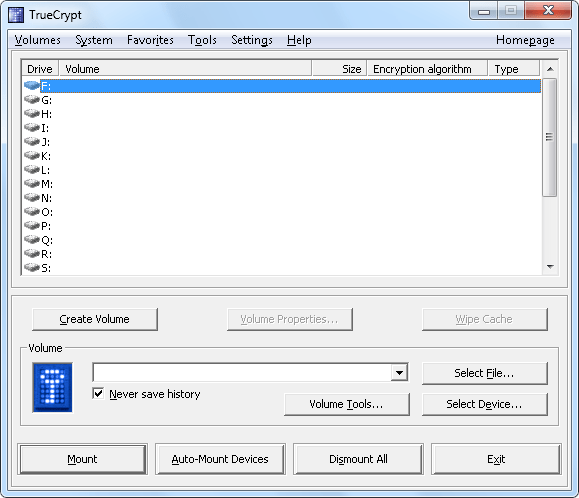
Hướng dẫn sử dụng TrueCrypt để mã hóa những tài liệu nhạy cảmCửa sổ chính của TrueCrypt
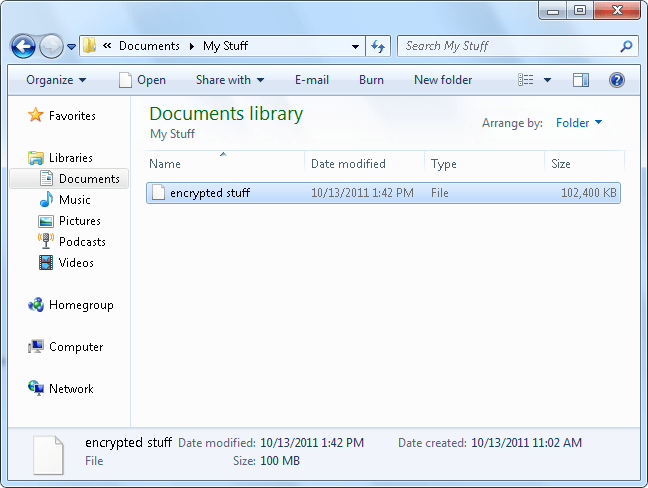
Khi bạn tạo một ổ đĩa ảo được mã hóa với TrueCrypt, thực tế là chúng ta tạo một vùng duy nhất để chứa các tập tin được gọi là File container, mà chỉ có thể mở hoặc giải mã với mật khẩu được chọn.
Hướng dẫn sử dụng TrueCrypt để mã hóa những tài liệu nhạy cảmVùng chứa dữ liệu được tạo trong Windows
Cũng như các tập tin bình thường khác, file trong ổ đĩa ảo này có thể được xóa, di chuyển hoặc sao chép. Chỉ khác ở chỗ bạn chỉ có thể truy cập vào chúng để làm việc này khi có mật khẩu chính xác.
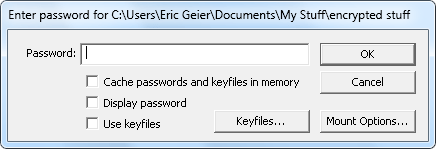
Hướng dẫn sử dụng TrueCrypt để mã hóa những tài liệu nhạy cảmYêu cầu nhập mật khẩu để truy cập tập tin trong ổ đĩa ảo
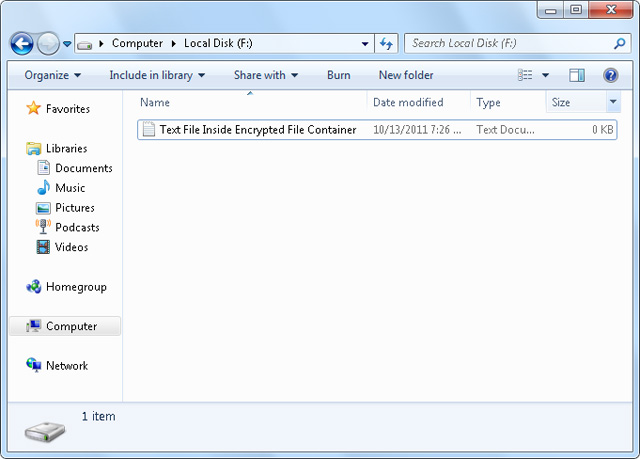
Ổ đĩa ảo xuất hiện như những ổ đĩa khác trong Windows (C hoặc D…).
Hướng dẫn sử dụng TrueCrypt để mã hóa những tài liệu nhạy cảm
Trong quá trình cài đặt bạn có thể sử dụng các thiết lập mặc định; việc cài đặt rất nhanh chóng và đơn giản.
Sau đó khởi động ứng dụng, thực hiện theo các bước dưới đây để tạo File container mã hóa:
1. Kích Create Volume để bắt đầu.
2. Chọn Create an encrypted file container và kích Next.
3. Chọn Standard TrueCrypt volume sau đó nhấn Next.
4. Kích Select File, điều hướng đến nơi bạn muốn đặt file container mã hóa, đặt tên cho nó và nhấn Save. Cuối cùng nhấn Next.
5. Trừ khi có lý do đặc biệt nào đó, nếu không hãy chấp nhận các tùy chọn mã hóa mặc định và kích Next.
6. Chỉ định kích thước muốn cung cấp cho file container. Đảm bảo cho nó đủ lớn để lưu trữ các tập tin tài liệu quan trọng. Nhấn Next.
7. Nhập vào mật khẩu để mã hóa/giải mã và nhấn Next.
8. Giữ nguyên thiết lập định dạng volume mặc định, nhưng hãy di chuyển con trỏ chuột xung quanh một cách ngẫu nhiên để tăng sức mạnh và độ an toàn cho mật khẩu. Sau đó kích Formatđể khởi tạo file container.
Để sử dụng file container mã hóa này bạn cần kết nối (mount) nó như một ổ đĩa. Cách cơ bản nhất để làm điều này là kích vào ổ đĩa mong muốn trên cửa sổ chính của TrueCrypt, chọnSelect File và tìm đến file container, nhấn Mount. Bạn sẽ được nhắc nhở về mật khẩu mã hóa đã thiết lập khi tạo file container, nhập vào và kích OK. Sau đó là truy cập vào các file trong cửa sổ bằng cách sử dụng Computer (hoặc My Computer). Cũng như các ổ đĩa khác, bạn có thể xem, truy cập từ các hộp thoại open/save trong Windows và các chương trình khác.
Nếu bạn muốn file container tự động gắn kết khi đăng nhập vào Windows, có thể thêm nó vàoFavorites của mình.
Continue reading →